Saturday, July 14, 2012

Watermelon Granita

So, what is granita? According to wikipedia it originated in Sicily and is in the sorbet and Italian ice family.  There are so many variations and flavor combinations you could make with this simple recipe, I am excited to try more.

Especially with these triple digit summers creeping in, its always nice to have a cool, refreshing, and healthy snack!

Unfortunately, I didnt take any pictures during the process of making this, just the final product. 

Watermelon Granita
6 cups of cubed and deseeded watermelon
handful of fresh blueberries
juice of one lime
1/4 cup of sugar


Put the watermelon into a blender or food processor for about one minute until completely blended.
Pour the juice into a strainer to remove the pulp.
Put the remaining juice back into the blender or food processor and add the blueberries, lime juice, and sugar.
Pulse until all is blended. 

Pour the mixture into a container that is ok to go in the freezer. I kept mine in the freezer overnight.  I scooped it with a metal ice cream scooper which kind of gave it a snow cone consistency. But you can also just keep it in the freezer for 4 to 5 hours and it would be more like a slushee because it won't be completely frozen.


Sunday, July 1, 2012

Spice Rub For Chicken and Roasted Asparagus

We have chicken breasts in this house a lot, so it's nice when you can change things up a bit and spice it up. 

This rub is super yummy and would work really well if you barbecued the chicken. I pan seared mine along with some quinoa and roasted asparagus. I could seriously eat a whole bundle of asparagus myself, love the stuff!

Spice Rub:
1/2 tsp. Paprika
1/4 tsp. salt
1/4 tsp. black pepper
1/4 tsp. cayenne pepper
1/4 tsp. onion powder
1/4 tsp. cumin

Mix all the ingredients together and sprinkle on both sides of the chicken and cook however you would like.


This rub would be enough to cover about 3 normal size chicken breasts, maybe 4, but I like to really cover the chicken.

Now for the roasted asparagus, this could not be any more simple! I think keeping veggies as natural tasting as possible and not overcooking is my favorite!

Roasted Asparagus

1 bundle of asparagus
olive oil
salt and pepper to taste
1/2 lemon 

Set oven to 425 degrees. Cut off the woody ends of the asparagus, you can usually tell where the asparagus is a little discolored, almost has a purplish hue. Or if you grab both ends and bend, the asparagus should naturally break at the right spot.
Spread the asparagus on a foil lined cookie sheet. Drizzle olive oil lightly over the asparagus and roll them around a bit to get them all coated. Sprinkle with a little salt and pepper.
Put them in the oven for about 10-15 minutes, depending on how think the spears are, you DON'T want to overcook them, I really don't like when they are mushy. You still want their bright green color. 
When they are finished cooking squeeze the lemon over them. You don't want to do it before the lemon will taste a little bitter if you cook it.
After the chicken rested for about 5 minutes I sliced it, put it on top of some quinoa I cooked with an avocado and greek yogurt sauce. 


Saturday, June 16, 2012

Vegan Pancakes with Strawberry Cashew Cream Sauce

Haha, here I go with the vegan again, right? There is a good explanation...the weekends are reserved for more thoughtful breakfasts since I actually have time.  These pancakes just happen to be one of my favorite recipes and it just happens to be vegan, and the post I did last night about the raw taco salad I got it from Oh She Glows and she included a post about different things to do with the leftover cashew sauce, so I just added some strawberries to it and voila, yummy breakfast!

Fluffy Vegan Pancakes
1 1/2 cups all purpose flour
3 1/2 teaspoons baking powder
2 tablespoons sugar
1 teaspoon salt
1 cup almond milk (or soy milk)
2 teaspoons apple cider vinegar
1 tablespoon ground flax seeds
1/2 cup water
3 tablespoons canola oil
1/2 teaspoon pure vanilla extract

In a large mixing bowl, sift together flour, baking powder, salt and sugar. Make a well in the center.

Measure the milk into a measuring cup. Add vinegar and ground flax seeds, and use a fork to vigorously mix the ingredients until foamy. This will take a minute or so.

Pour the milk mixture into the center of the dry ingredients. Add the water, canola oil and vanilla and use a fork to mix until a thick, lumpy batter forms. That should take about a minute. It doesn’t need to be smooth, just make sure you get all the ingredients incorporated.

Preheat the pan over medium-low heat and let the batter rest for 10 minutes.
Lightly coat the pan in oil. Add 1/3 cup of batter for each pancake, and cook for about 4 minutes, until puffy. Flip the pancakes, adding a new coat of oil to the pan, and cook for another 3 minutes or so. Pancake should be about an inch thick, and golden brown.


Rest pancakes on a cooling rack covered with tin foil until ready to serve. To reheat, place pancakes in on a baking sheet covered with tin foil in a  300 F degree oven for 5 minutes or so.

The recipe below is for the entire recipe, I just used about 1/2-3/4 of the recipe and blended with about 6-10 strawberries.

Strawberry Cashew Nut Cream Sauce
 
  • 1 cup macadamia (or cashew) nuts, soaked in water for 2-8 hours
  • 11-12 tbsp water (use as needed to achieve desired consistency)
  • 2-3 tbsp fresh lemon juice, to taste
  • fine grain sea salt, to taste (I used just over 1/4 tsp)
Drain and rinse the soaked nuts. Add them into a processor and process. Stream in about 1/2 cup water and a couple tbsp of lemon juice. Add more water as needed to achieve your desired consistency. The nut sauce should be super smooth and not grainy. Add salt to taste.


Friday, June 15, 2012

Raw Taco Salad

Ok, so let's start this off by saying I am not vegan, vegetarian, or a raw foodie, however I love incorporating these new (to me) and unique ways of cooking. I just love food, so anytime I get the opportunity to try something new I'm all over it!

This is a raw dish, thanks to Oh She Glows website. I follow her blog and I have tried several of her recipes. I have been going back to this recipe several times ever since she posted it on Tuesday and finally decided to make it. 


What you will need:


1/2 walnuts soaked for 2-8 hours (I had them soaked for about 10 while I was at work and they were just fine.
1 cup of cashews soaked for 2-8 hours (same thing as above)
1 1/2 tsp chili powder
1/2 tsp cumin 
salt to taste
cayenne pepper to taste
1/2 cup to 1 cup of water (for desired consistency)
2-3 tbsp fresh squeezed lemon juice
Any lettuce you prefer (I used romaine)
Any veggies you want to put on a taco salad (I used tomato, green onion, corn and avocado) Black beans would be good, I didn't have any :(
Tortilla chips

First things first is to make the walnut taco meat.  Rinse and drain the soaked walnuts and put in a food processor with the chili powder, cumin and salt. Pulse a few times to combine the ingredients, but be sure to keep the walnuts chunky.
See it even looks like taco meat huh?


Next, make the cashew cream sauce. Rinse and drain the soaked cashews and put them in the food processor, start the food processor and pour in the water and lemon juice while it's still going, you want to achieve a smooth consistency, like salad dressing, not grainy. 


Last, all you have to do is assemble your salad and I topped mine off with tortilla chips for a yummy crunch.


Roasted Chicken With Green Beans and Potatoes

Ok this is going to be one of those posts that you will just have to "wing it" with the recipe. A pinch of this, a dash of that...sometimes that's just how I do it LOL. 
I have this spice mixture that my best friends mom makes that I put on basically everything, but I'm not sure what is in it, it's her secret recipe (which I am out of btw, I need to place another order) But that was almost the base of this entire dish, so I'll try to offer some suggestions for replacement.


1/4-1/2 cup of olive oil (You can always add more as you go)
2 lemons
4 cloves of garlic minced
1 tsp of salt
1/2 tsp of black pepper
3/4 pound of trimmed green beans
8 small red potatoes cut into a little bigger than dice sized pieces
2 bone-in chicken breasts (the ones we had were huge and we had enough for three people, plus leftovers)

Preheat oven to 450 degrees. Drizzle about 1 tbsp of the olive oil on the bottom of a baking dish. You can slice the lemons and place them on the bottom of the pan if you wish, but I found that it didn't really contribute to the flavor that much. 

In a large bowl combine the rest of the olive oil (again if you want to start out with a little and add more you can), garlic, salt, pepper, and here's where it gets tricky...this is where I added the "secret spice mixture" but I would incorporate some Italian seasonings maybe some basil and oregano, or if you have an Italian Seasoning blend that would work well. I would add maybe 1 tbsp and a half of that to the olive oil mixture.

Now that the olive oil mixture is ready, add the green beans, coat and put in the bottom of the baking dish. I used a slotted spoon to pull them out so the olive oil mixture can drip back into the bowl because after the green beans, you will toss the potatoes in that mixture too. 


Repeat and add the chicken last. Keep an eye on the mixture, if you need to add more oil and spices. When the chicken is good and covered place them on top of the veggies and pour any remaining oil mixture over the chicken.
  
Leave it uncovered and put it in the oven for 50 minutes, depending on the size of the chicken they might cook faster.  Just use a meat thermometer and when the chicken reaches 165 degrees you can take out the chicken and place it on a plate covered with foil until the veggies are done. I made the mistake of cutting the potatoes too large and so by the time the potatoes were finally done, the beans were a little overdone :( but, it all turned out fine.
 

Wednesday, May 23, 2012

BLT Wraps and Cold Thai Noodle Salad


Since I live in Southern California and my commute to and from work is about 50 miles combined, that translates into about an hour and a half of drive time. During that time I can get quite a lot accomplished, whether I am figuring out what I am doing for the weekend, putting together a shopping list, going over my bills, but most likely I am trying to decide what is for dinner that night. Today wasn't a particularly hot day (low 80's) considering the last couple of days have been mid 90's and it's not even June yet :( But, even though it wasn't a scorcher I didn't feel like turning the oven on and heating up the house, that translated into the BLT wrap. 

Tortillas
Cream Cheese
Tomato
Bacon
Lettuce
Avocado 
Salt and Pepper to taste

Assemble and enjoy...yum :) 


So, the next question was what to eat with it...so many thoughts went through my head: quinoa salad, steamed veggies, brown rice...none sounded very appealing. Pinterest to the rescue again. I made a cold thai noodle salad.


box of rice noodles (I used soba noodles)
1 cucumber
1 tomato
shredded carrots
cilantro
toasted sesame seeds

1/3 cup rice vinegar
1/3 cup soy sauce
1 1/2 tsp sesame oil
juice from one lime
2 tbsp brown sugar
2 cloves minced garlic
red pepper flakes to taste

Julienne the cucumber, grate the carrot, de-seed then chop the tomato, chop the cilantro and toast the sesame seed. Place in a bowl and set aside. Since soba noodles only take about 4 minutes to cook I prepped and cut everything first.
Combine everything for the sauce and set aside. Boil the noodles then place under cold running water.  Make sure all the water is drained before you add to the veggies. 
Combine the veggies, noodles and dressing. You can refrigerate for about an hour or just eat right away (I clearly couldn't wait).


Monday, May 21, 2012

Chocolate Meringue Cupcakes

WOW!!!!


Alright, had to get that out there. Now, on with the recipe! So, my friend is a huge Giada De Laurentiis fan, she saw her making this recipe so we HAD to try it! The nice thing is that you have probably everything in your pantry already. (Always a plus with me when I am cooking/baking)


Cupcakes:

  • 2 large egg yolks, at room temperature
  • 1/4 cup vegetable oil
  • 2/3 cup sugar
  • 2 tablespoons unsweetened cocoa powder
  • 1 teaspoon pure vanilla extract
  • 1/2 teaspoon ground cinnamon
  • 1/8 teaspoon fine sea salt
  • 1/2 cup semisweet chocolate chips, melted (best to use double boiler)
  • 1/4 cup cake flour
  • 3 large egg whites, at room temperature

Topping:

  • 1 cup semisweet chocolate chips, melted
  • 1 tablespoon vegetable oil

Directions

For the cupcakes: arrange an oven rack in the center of the oven and preheat the oven to 350 degrees F. Line a 24-count mini-muffin pan with 1.25-inch diameter paper liners and set aside. (we used regular sized cupcake pan/paper liners and it turned out fine.

In a medium bowl, using an electric hand mixer, beat the egg yolks, vegetable oil, 1/3 cup of the sugar, cocoa powder, vanilla extract, cinnamon, and salt, at high speed until smooth, about 2 minutes. Mix in the melted chocolate chips and stir until smooth (mixture will be thick).


In a separate bowl, using an electric hand mixer, beat the egg whites at high speed until they hold soft peaks, about 3 minutes. With the machine running, gradually add the remaining 1/3 cup sugar and continue to beat until the mixture holds stiff peaks, about 2 minutes. Stir 1/3 of the egg white mixture into the chocolate mixture. Using a spatula, fold the remaining egg white mixture. In batches, sift the flour over the batter and fold it in using a spatula. Fill each paper liner to the top with batter and bake for 12 minutes until puffed. Remove from the oven and let cool for 15 minutes.
For the topping: In a small bowl, combine the melted chocolate chips and oil. Stir until smooth.
Using a fork, drizzle the chocolate mixture over the cupcakes. 
 I ate them both warm and cold....it doesn't matter, these beats are amazing. I almost feel like Dr. Seuss, I will eat them cold, I will eat them warm, I will eat them here, I will eat them there, I will eat them anywhere LOL.

Tuesday, May 15, 2012

S'Mac

Raise your hand if you like macaroni and cheese! It is definitely a nostalgic food, taking you back to the blue box days, but it is all grown up now! Especially if you are in New York, you HAVE to stop by S'Mac. This is yet another place I found by watching The Food Network, this time however I was watching "The Best Thing I Ever Ate" and it was comfort foods edition.

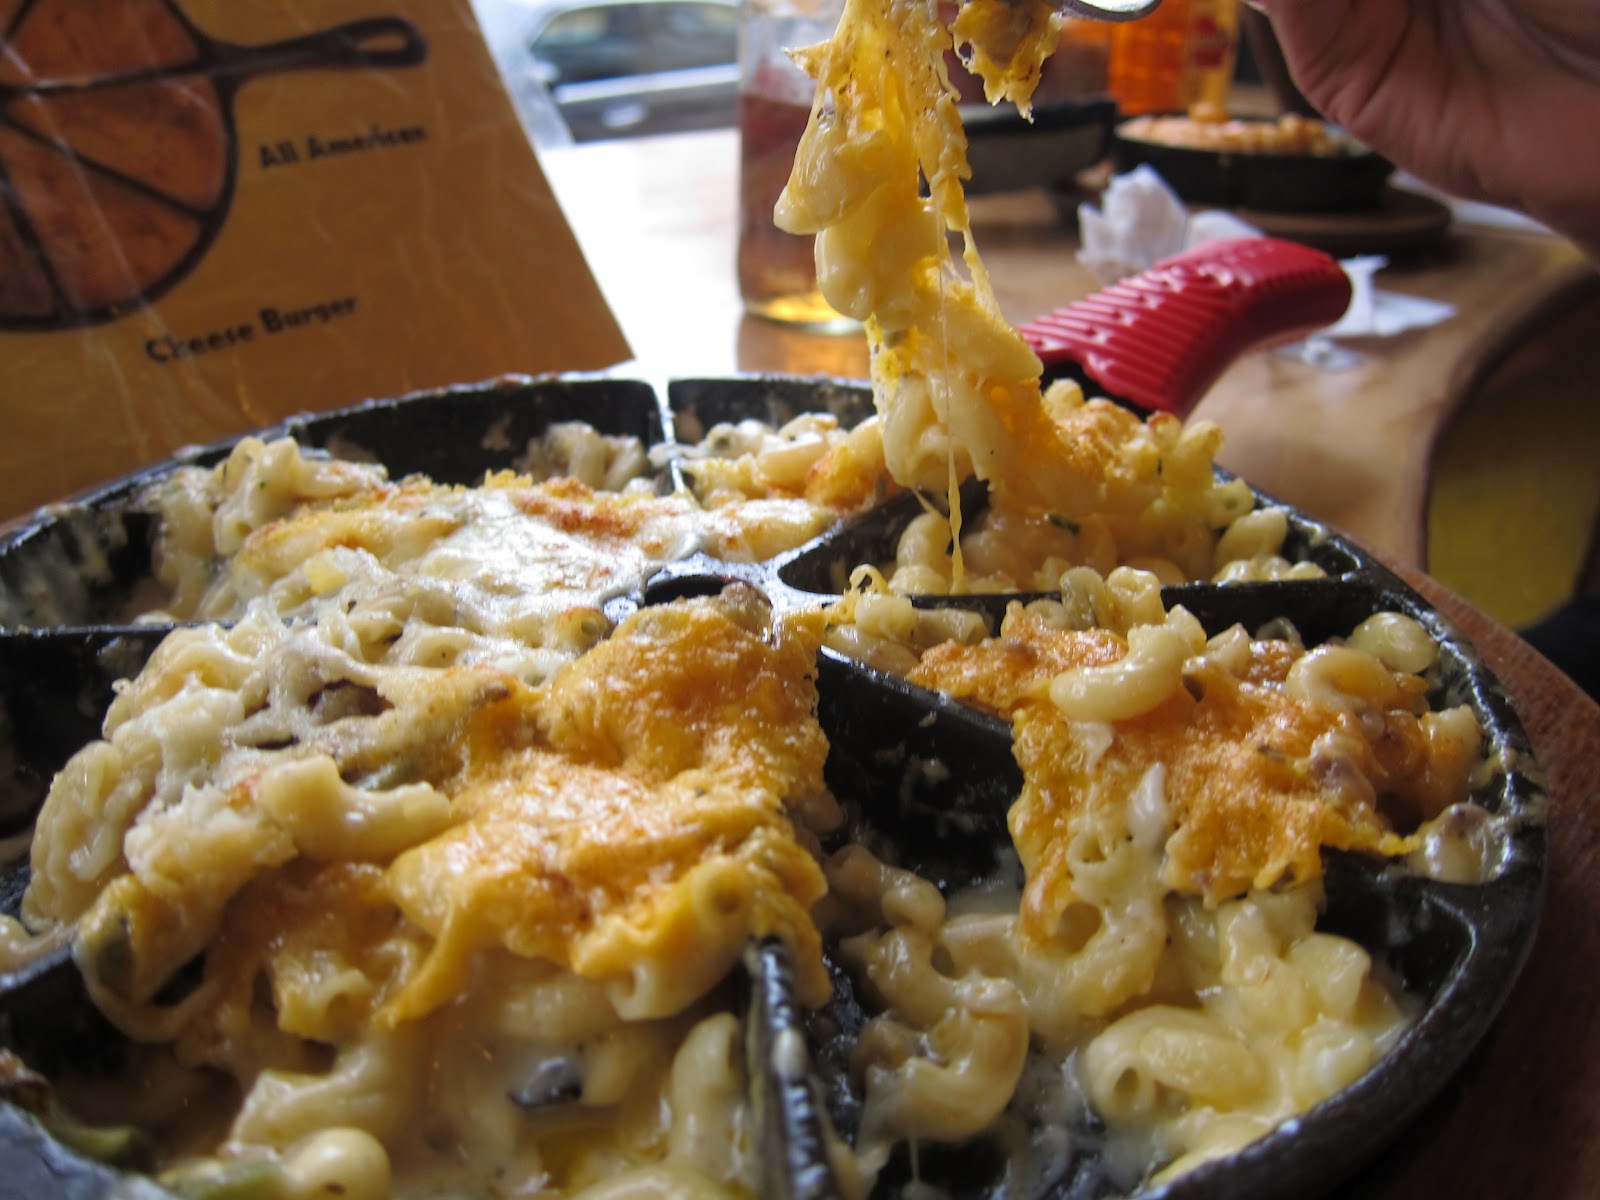
 The macaroni and cheese here comes served in a cute individual cast iron skillet. Hey, you gotta eat with your eyes first, right? And when you have bubbly cheesey goodness sitting right in front of you, how can you resist?

Since it was our first time we had to try them all, thankfully they had a sampler platter that even came with a cute little legend that you put in front of the skillet so you know what you are eating...genious!
You can't really see it, but the sampler came with:
La Mancha: A taste of Spain right at your fingertips! Flavorful Manchego cheese accented by fresh fennel and onions.
Parisienne: Mac-n-Cheese for the "upper crust". Creamy Brie, roasted figs, roasted shiitake mushrooms & fresh rosemary
Napoletana: Like Neapolitan Pizza? Then you'll love this! Fresh Mozzarella, roasted tomatoes, roasted garlic, and fresh basil.
All American: Just the way you remember it as a kid! Nostalgia at its finest - a tasty blend of American & Cheddar cheeses.
Cheeseburger: For the Hearty Meat Eater! Cheddar and American cheeses combined with seasoned Ground Beef.
4 Cheese: Our four cheese delight! Cheddar, Muenster, Gruyere and a touch of Pecorino.
 Cajun: If you are looking for some kick, here it is. Cheddar & Pepper Jack cheeses, andouille sausage, green pepper, onions, celery, garlic and, of course, some genuine Cajun seasoning.
Alpine: A Swiss Mac that keeps you coming back for more. Gruyere coupled with its partner in crime, slab bacon.

We also ordered a small order of the Buffalo Chicken: Cheddar & American cheeses with boneless chicken pieces and buffalo wing sauce. We’ll even top it off with crumbled blue cheese if you’d like!

Next time I go (because I will definitely be going back) I will keep it simple and probably just order the 4 cheese.

Creamy Garlic Pasta

I'm not sure why it took so long for me to join the revolution that is pinterest, nonetheless I have joined, I love it, I might be slightly obsessed, but who cares.  It is awesome the way we can share ideas this way. This post happens to be about my first pinterest recipe success :) I am sure there will be some failures too, which I will gladly share as well haha!

I (along with many others I'm sure) grew up on rice-a-roni, pasta-roni, etc.  There is nothing wrong with that, I turned out just fine, but I now realize how homemade and fresh ingredients make you feel so much better and are better for you too. That being said, this recipe tastes EXACTLY like pasta-roni!! I just added some rotisserie chicken for the protein factor and voila, you have a meal. I should have steamed some veggies that would have added nicely too, maybe you can try that.

2 tsp olive oil
4 cloves garlic, minced
2 tbsp butter
¼  tsp salt
½ tsp pepper
3 cups chicken stock
½ lb spaghetti or angel hair pasta
1 cup grated parmesan cheese
¾ cup heavy cream (I just used 1% milk to make it a little healthier)
2 tbsp chopped fresh parsley
add chicken or veggies to make it a complete meal

In a pot, bring the olive oil to medium-low heat. Add the garlic and stir, allowing it to cook for 1-2 minutes. Mix in the butter until melted. Add the salt, pepper and chicken stock. Raise the heat to high and let it come to a boil. 
Once it is at a rolling boil, add the pasta and cook for as long as the box’s directions indicate. Reduce the stove to medium heat and mix in the parmesan until completely melted. Turn off the heat and stir in the cream and parsley. Serve immediately

Monday, May 14, 2012

Levain Bakery Copycat Cookies


If you only eat one chocolate chip cookie for the rest of your life, this HAS to be it!

A few years back I was watching Bobby Flay's Throwdown (yes I love him, and yes in my spare time I watch the Food Network) well, he was featuring Levain Bakery and I have been hooked ever since. I have been to New York twice since then and have to make that stop every time I go! Sadly, they do not have their recipes available, but through much time browsing through several recipes I think I found the one!


Without further delay, here is how you make these amazing creatures!

8 oz COLD (that is the key) butter cut into small cubes
3/4 cup of granulated sugar
3/4 cup of packed light brown sugar
1 tsp vanilla extract
2 large eggs
3 cups all purpose flour
3/4 tsp sea salt
1 1/4 tsp baking powder
1/2 tsp baking soda
12 oz chocolate chips
1 cup walnuts (optional...sometimes I use them and sometimes I dont)

If you are going to use the dough right away preheat the oven to 365.  I recommend to refrigerate the dough for at least 2 hours, you can refrigerate overnight too. Although, with all of that goodness in a bowl waiting to become these beasts of a cookie, it won't be easy.
In a mixing bowl, beat butter, granulated, and brown sugar until just combined.  With each step remember to not overmix.  Add the egg and vanilla to the butter/sugar mixture and beat, set aside.  In a smaller bowl sift together flour, baking soda, baking powder and salt. Add the flour mixture a little bit at a time to the wet ingredients until just blended. It may be a thick, almost crumbly batter, it is ok. When everything is well incorporated you can stir in the chocolate chips and walnuts.

Divide the batter into 12 4oz balls.  Do not press them flat. If you do not have a food scale, think about making them into GIANT golf balls. After I form the cookie balls I will put them back into the bowl and into the fridge for a couple of hours.
When you are ready to bake them, preheat the oven to 365 and place the balls on an ungreased cookie sheet, I used a silpat. If your batter makes more than 12 cookie balls just put the bowl back in the fridge until you put in the second batch. Bake for 18-22 minutes, check on them and when they start to get golden brown take them out. You may not think they are done in the middle, but just let them sit for a few minutes and you will be in heaven!!